Without filters, all records in the database will be in the result, which is seldom desired, especially in Sitka’s context where libraries share the same database. So some filters should be applied to keep out the unwanted records.
The following procedure shows how to add filters to the example template:
- Select the Filters tab at the bottom.
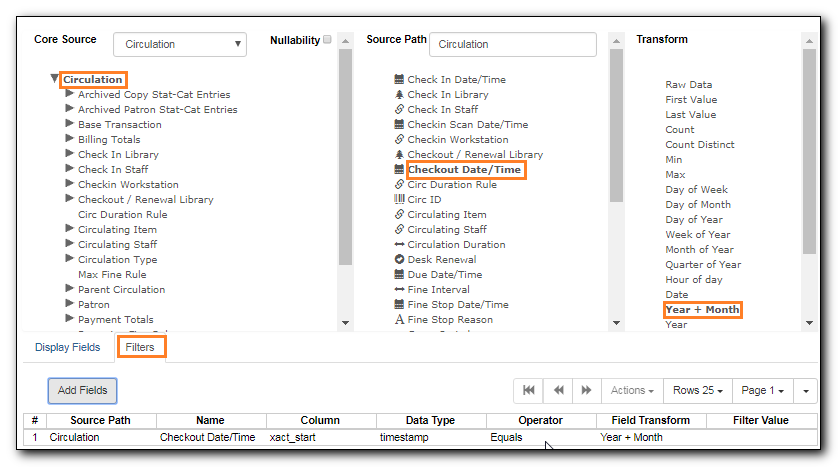
For this circulation statistics example, select Circulation table, Check Out Date/Time field and Year + Month in transform column,then click on Add Fields. We are going to filter on the checkout month.

Note that this is a template, so the value for this filter may be filled up when you run the report.
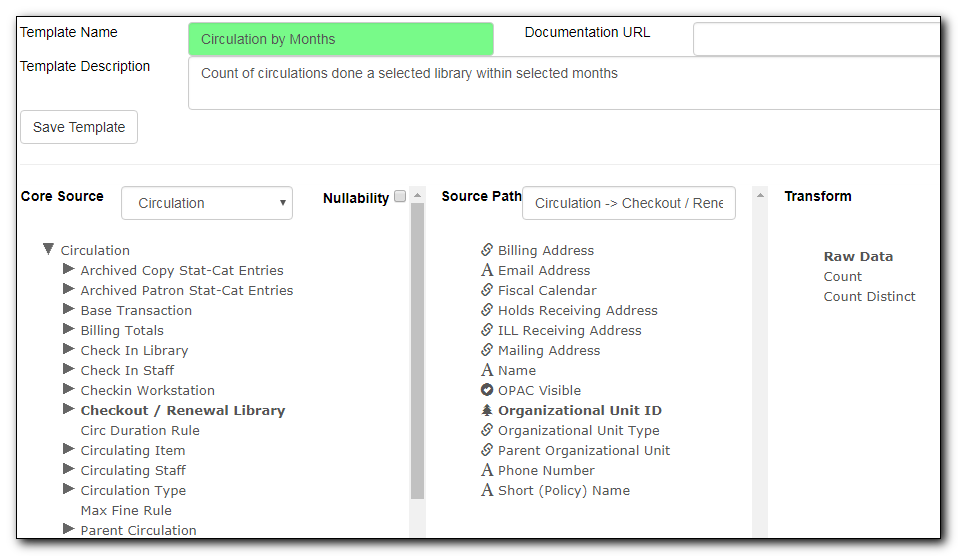
To filter on the location of circulation, click the arrow in front of Circulation table to list the linked tables. Click Checkout/Renewal Library table to list its fields. Select Organizational ID and Raw Data transform, then click on Add Fields.

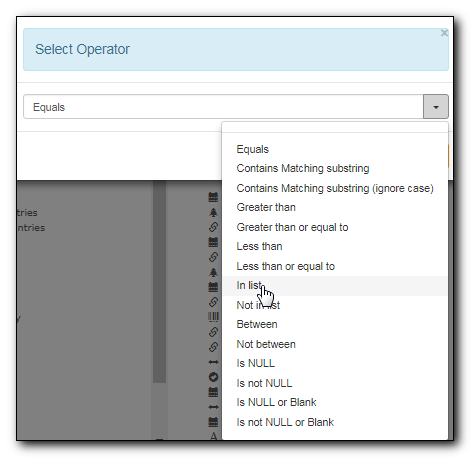
Note that the default operator for the filter is Equal, which allows you to specify one checkout library only. For multi-branch libraries, you may want to change the operator to In List so that you could specify multiple branches when you run the report. To do so, you need to change the operator to InList. Select Checkout/Renewal Library row. Click on Actions → Change Operator and select In list from the drop down menu in the popup window.


Tip
Generally, for filters on ID field, such as the above Checkout/Renewal Library ID, the report interface will generate a selection list for you to choose, instead of a box for you to type in the ID when you run the report.
You may add a hint to the filter, e.g. explaining the function of the filter, what value is expected when setting up the report, etc. Select the filter and click Actions → Change Column Documentation to change field hint.
In the above example, we added some instruction on how to fill up the filter when setting up the report. The hint will show up on the report creation screen. Below is how it looks like on the report creation screen.

- Once you have configured your template, you must name and save it. Name this template Circulations by Months. You also need to add a description, otherwise the template can not be saved. Click Save Template.
- You will get a confirmation dialogue box that the template was successfully saved. Click OK/Continue.
Once a template is saved, it can not be edited anymore. To make changes you will need to clone it and edit the clone. This will ensure that the work you have done will not be lost. As mentioned before, creating a template is complex. The first try seldom gets the perfect result. Your subsequent changes may not always improve the result. You may need to refer back to your old version. Make changes step-by-step. Check the correctness of the result on each step. This may help you find out the exact cause of the issue. After you have the desired template, you may delete all the interim ones.
The above paragraphs described how to create a template from scratch with a very simple example. You may choose, instead, to use one of the generic templates created by Co-op support to meet common reporting needs. (see Chapter 28, Shared Sitka Templates). However, knowing how a template is created will help you understand the report structure and is recommended as an introduction to editing template fields and filters.
