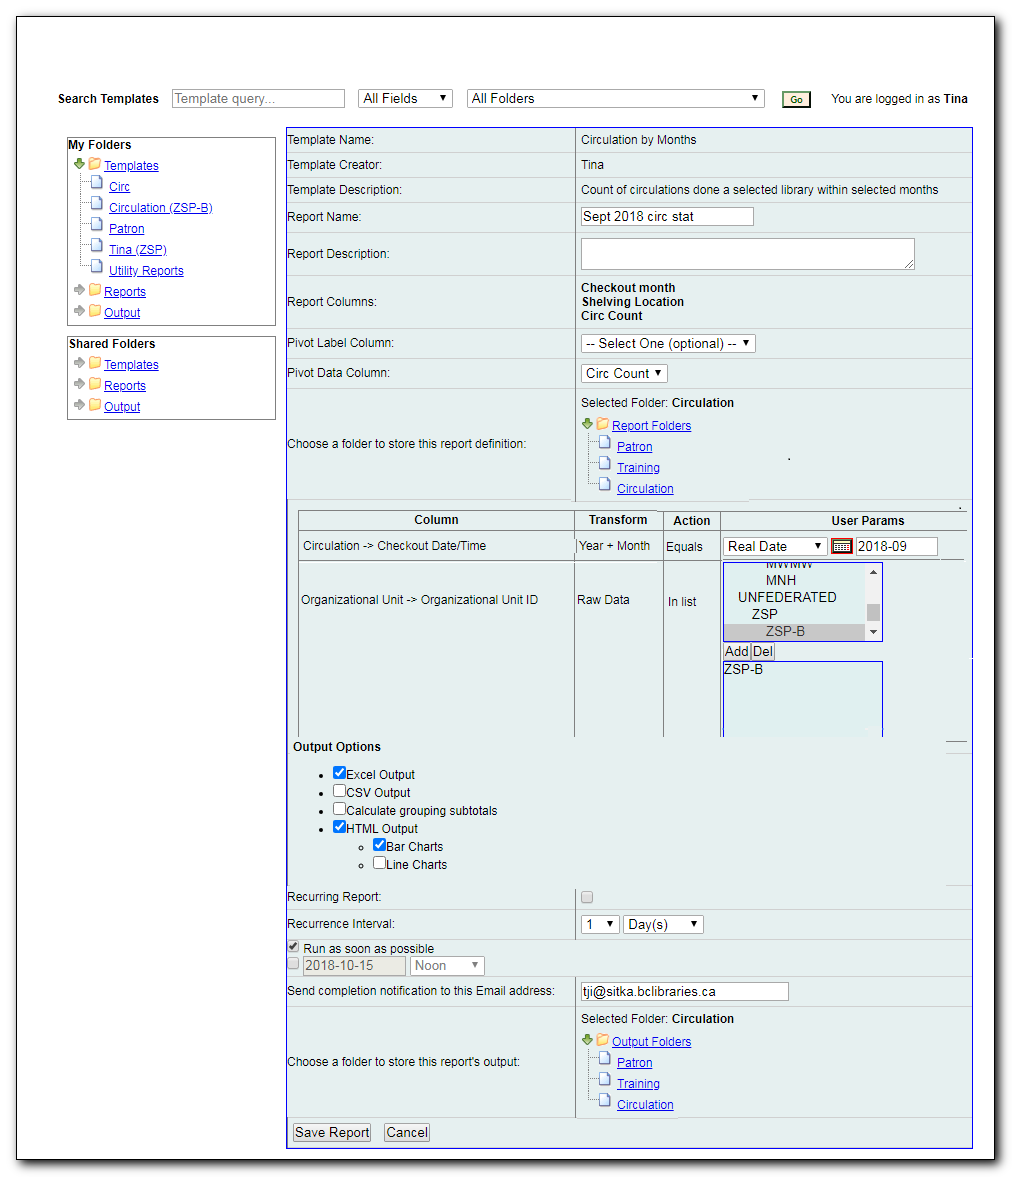
Now you are ready to run a report from the template you have created.
- Find the template you just created in the Template folder. In the My Folders section, click the arrow next to Templates to expand this folder and select Circulation.
Select the check box in front of Circulations by Months. Select Create a new report from selected template from the drop down menu. Click Submit.

Complete the first part of report settings.

- Template Name, Template Creator, and Template Description are for informational purposes only. They are hard coded when the template is created. At the report definition stage it is not possible to change them.
- Report Name is required. Reports stored in the same folder must have unique names.
- Report Description is optional, but may help distinguish among similar reports.
- Report Columns lists the columns that will appear in the output. This is derived from the template and cannot be changed during the report definition.
- Pivot Label Column and Pivot Data Column are optional. Pivot tables are a different way to view data. If you currently use pivot tables in MS Excel it is better to select an Excel output and continue using pivot tables in Excel. Please note that Pivot tables are suitable to some result data only.
- You must choose a report folder to store this report definition. Only report folders under My Folders are available. Click on the desired folder to select it.
Select values for the Circulation > Check Out Date/Time. Use the calendar widget to choose or manually enter the desired date (always in YYYY-MM or YYYY-MM-DD format).
The Transform for this field is Year + Month, so even if you choose a specific date (2018-09-20) it will appear as the corresponding month only (2018-09).
- Select a value for the Checkout/Renewal Library on the Organizational Unit list, then click Add. You may add more than one library. You may use CTRL or SHIFT plus mouse click to select multiple libraries, then click Add, too.
Complete the bottom portion of the report definition interface, then click Save Report.
- Select one or more output formats. In this example the report output will be available as an Excel spreadsheet, an HTML table (for display in the staff client or browser), and as a bar chart. Please note that charts are suitable to some result data only.
- Check the “Calculate grouping subtotals” checkbox to add an unlabeled row or column with the subtotals for each grouping and an unlabeled grand total row or column. Please note group subtotals and grand totals are suitable to some result data only.
- If you want the report to be recurring, check the Recurring Report box and select the Recurrence Interval as described in Chapter 31, Running Recurring Reports. In this example, as this is a report that will only be run once, the Recurring Report box is not checked.
- Select Run as soon as possible for immediate output. It is also possible to set up reports that run automatically in the future.
- It is optional to fill out an email address where a completion notice can be sent. The email will contain a link to a password-protected report output which staff with permission to view report output can access. If you have an email address in your account, it will automatically appear in the email notification box. However, you can enter a different email address or multiple addresses separated by commas.
- Select a folder for the report’s output.
- You will get a confirmation dialogue box that the Action Succeeded. Click OK.
Once saved, reports stay there forever unless you delete them. When a report is deleted all the linked output files will be deleted, too.
Report files are viewable and editable (recurring report only). You may view the contents of a report. You can generate a new report based on the past report file or re-schedule a recurring report. See Chapter 32, Viewing/Editing/Rescheduling Reports for details.
Tip
- The required value for filters should be in a format corresponding to the data transform. For example, for a call number field transformed to First Continuous Non-space string, you need to put in the call number prefix; for a field transformed to Count you need to give an integer. See Chapter 35, Template Terminology: Data Types, Transforms, and Operators for more on Data Transforms.
- Action corresponds to Operator used for filter fields. It specifies how the given value will be compared with the field value. See Chapter 35, Template Terminology: Data Types, Transforms, and Operators for more on Operators.
- When creating a report, you may disable an unwanted filter in the template by choosing an appropriate value for it. For example, if a template lists items created within a time frame, specify a time frame between "1900-01-01" and "today" to cover the whole collection; select all copy statuses on the list to bypass the filter on item status.
- If the calendar widget is not provided for a date filter, key in the date in format yyyy-mm-dd.
