Table of Contents
Setting Up Report Folders (2:51)
There are three main components used by the Reports module: Templates, Reports, and Output. Each of these components must be stored in a folder. Folders can be private (accessible to your login only) or shared with other staff at your library or other libraries in your federation or lending zone. It is also possible to selectively share only certain folders and/or subfolders.
Caution
A shared subfolder must be created in a shared folder. The sharing scope of the subfolder should be within the sharing scope of the parent folder. For example, a subfolder shared with your federation should only be in a parent folder shared with your federation. It should not be in a folder shared with your library only. Though creating shared subfolders in unshared folders or a subfolder with the sharing scope exceeding its parent’s is not blocked by Evergreen, serious consequences will be caused by such folders. You must be cautious when creating shared subfolders.
There are two parts in the folders pane. The My Folders section contains folders created with your Evergreen account. Folders that other users have shared with you appear in the Shared Folders section under the username of the sharing account. You can only view the contents or clone the templates in the shared folders, but not make any change in the shared folders. The cloned template can only be saved into your own folder.
Whether you are creating a report from scratch or working from a shared template you must first create at least one folder.
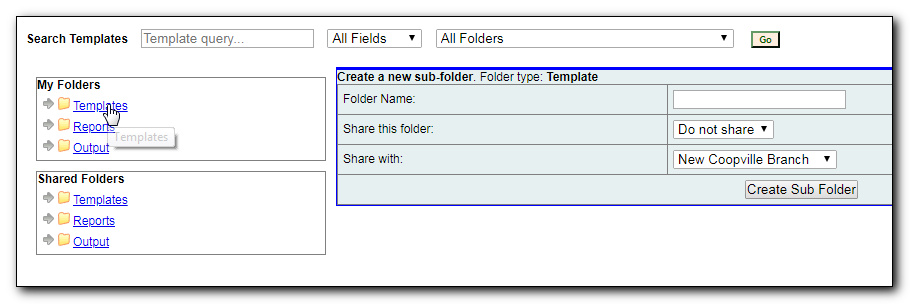
The steps for creating folders are similar for each reporting function. It is easier to create folders for templates, reports, and output all at once at the beginning, though it is possible to do it before each step. This example demonstrates creating a folder for a template.
Click on Templates in the My Folders section.

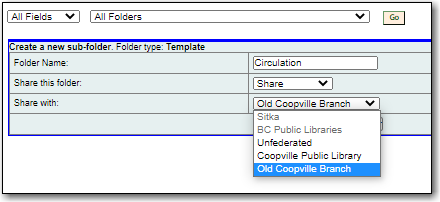
- Name the folder. Select Share or Do not share from the drop down menu.
If you want to share your folder, select whom you want to share this folder with from the drop down menu.

- Click Create Sub Folder, and then OK on the confirmation prompt.
- Next, create a folder for the report definition to be saved to. Click on Reports.
- Repeat steps 2-4 to create a Reports folder also called Circulation.
- Finally, you need to create a folder for the report’s output to be saved in. Click on Output.
- Repeat steps 2-4 to create an Output folder named Circulation.
Tip
Using a parallel naming scheme for folders in Templates, Reports, and Output helps keep your reports organized and easier to find.
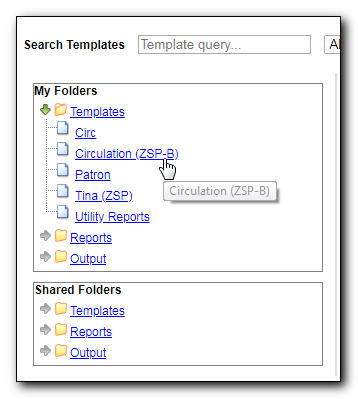
The folders you have just created, will now be visible by clicking the arrows in My Folders. Bracketed after the folder name, is the name of with whom the folder is shared. For example, Circulation (ZSP-B) is shared with the New Coopville Library. If it is not a shared folder, there will be nothing after the folder name. You may create as many folders and sub-folders as you like.

Tip
Clicking the blue text of a folder name displays the contents of the folder in the right pane. Clicking the arrow in front of a folder name displays its subfolders.
