Clear Cache
Click Menu.

- Click More tools.
- Click Clear browsing data.
Set Time Range
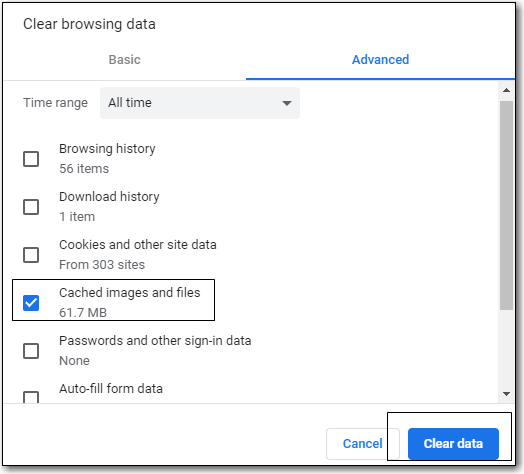
- All time
- Check the box next to Cached images and files (other boxes can be left unchecked).
Click Clear Data.

If you log in and see a blank page with the green bar across the top, but nothing else will load, you may need to clear your browser’s cache and cookies.
Caution
Before you clear cookies, be aware that clearing cookies will cause you to lose your registered workstations and local settings if they are still stored on the browser. As of Evergreen 3.3 these settings are stored on the Sitka server, and they have to be moved from browser to server manually. Clearing cookies, and subsequently reconfiguring local settings in Evergreen, will manually save settings to the Sitka server by default, and then clearing browser cookies will no longer be a concern for local settings. It is important to remember your workstation name. Your workstation settings and preferences are stored on Sitka’s Evergreen server with your workstation name. If you rename your workstation you will lose your stored settings and preferences.
Clear Cookies
Click Menu.

- Click More tools.
- Click Clear browsing data.
- Check the box next to Cookies and other site data.
- Check the box next to Cached images and files.
Set Time Range
- Last hour (recommended)
- Click Clear Data.
- Return to https://catalogue.libraries.coop/eg/staff
If you still see a blank page with the green bar across after clearing your cookies the next step is to delete the offline database.
- Navigate to https://catalogue.libraries.coop/eg/staff
Click Menu.

- Click More tools.
- Click Developer tools.
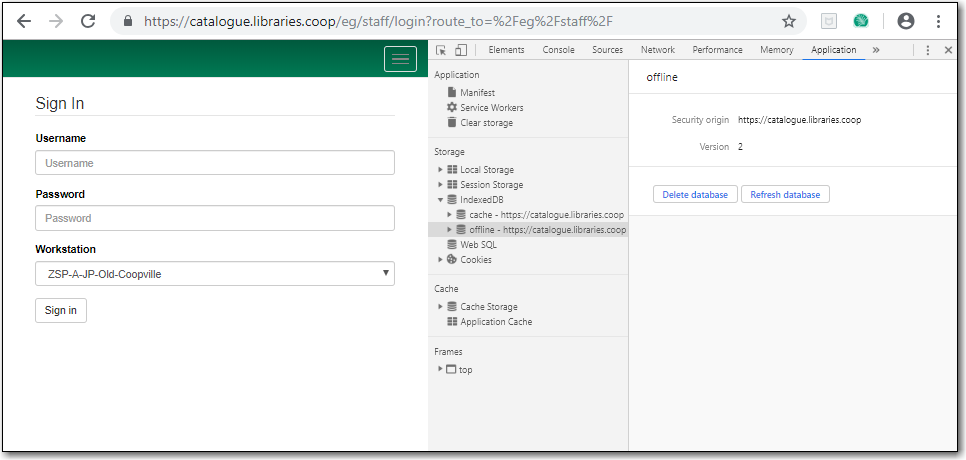
- Switch to the Application tab (you may need to click on the double arrow so see all the tabs).
- Expand the Indexed DB section.
- Click on the offline - https://catalogue.libraries.coop section.
- Click the Delete database button.
Click the X in the upper-right corner of the section to close the tool frame.

If you have Hatch installed, use these directions to reconnect your browser to Hatch after clearing your cache or deleting the offline database.
- Reconnect your browser to Hatch
- Log in with a Local System Administrator account.
- Register workstation and click Use Now to log in again.
- Navigate to Administration → Workstation → Print/Storage Service ("Hatch").
- Select Use Hatch For Printing.
- Click on the Home icon.
- You will be returned to the workstation registration screen again - click Use Now to log in again.
- Your local settings should now be restored.
If you are having problems, please include screenshots and error messages from the console(s).
Chrome Console Messages:
Click Menu.

- Select More Tools.
- Select Developer Tools. (This will open a pane on the right-side of your browser.)
- Select the Console tab.
- Change the "Default" dropdown to be sure that Verbose is checked.
- Either take a screenshot or copy and paste the text that appears in the console when you see the errors occurring. Be sure to include any of the errors that display in red.
Hatch Extension Console Messages:
- In Chrome, click Menu.
- Select More tools.
- Select Extensions.
- Check the box at the top of the screen that says Developer Mode.
- Scroll down to Hatch Native Messenger.
- Click on the link that says "background" page. (This will open a new window.)
- Select the Console tab.
- Change the "Default" dropdown to be sure that Verbose is checked.
- Either take a screenshot or copy and paste the text that appears in the console when you see the errors occurring. Be sure to include any of the errors that display in red.
Note
Please read the section called “Guidelines for Support Requests” before submitting your ticket.
